
Late last year, Google informed all Google Play Developer Console account holders (for accounts created before September 2023) that their accounts would need to be verified by Google and to select their verification deadline by February 29th of 2024. The verifications windows were supposed to open in June but were delayed (for reasons only known to Google) until August of this summer. We have recently completed the process and decided to document it here in hopes of helping others that still need to go through the verification process.
The process is pretty straightforward, the hardest part in some cases may be to locate the necessary documentation that Google requires for the verification. The process involves 7 general steps
- Getting Started
- Selecting the Account Type
- Linking A Payment Profile
- Entering Organization Information
- Entering Contact Details
- Filling Out Your Developer Profile
- Providing Necessary Documentation to Complete The Verification Process.
1. Getting Started
To get started, you simply need to go to your Google Play Developer Console account (https://play.google.com/console/) sign in, and then right on your home page, you should see a deadline box that looks something like:
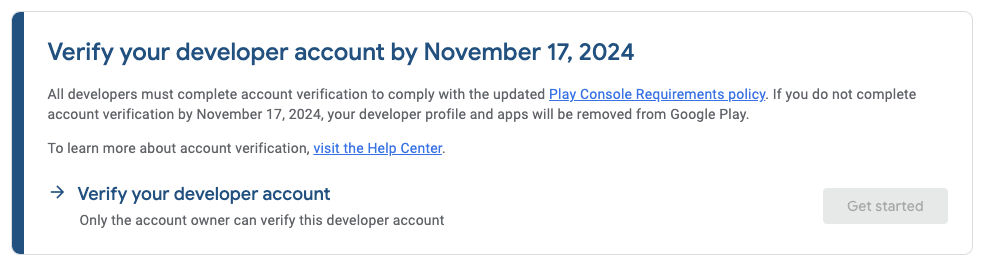
Click the Get started button.
Notes
- Your deadline date will be different.
- If you don’t see the deadline box, then click on Account Details in the menu on the left hand side and you should see a deadline box (note that if you don’t see Account Details in the menu, it likely means your account has already been approved!).
- If the Get Started button is not enabled (like shown above), it could mean one of two things:
- Your window to get your account verified has not started yet. Click on Account Details and in the deadline box on that page, there should be a line that says “Start account verifications in Play Console from DATE (60 days before deadline). You just need to wait until that DATE (note that you may have to wait until the next day).
- You are signed in with the wrong account and don’t have the proper access to perform the verification steps. Check the Contact email address displayed under Account Details and make sure you sign in with that account.
2. Selecting the Account Type
This step is pretty straightforward. You need to select your account type. Either “Organization account” or “Personal account”. If you are one of our customers, you will most likely need to select “Organization account”.
Note: This guide only covers Organization accounts.
3. Linking A Payment Profile
For this step, you will need to enter your D-U-N-S number for your organization so that it can be linked to your account. The Data Universal Numbering System, abbreviated as DUNS or D-U-N-S, is a proprietary system developed and managed by Dun & Bradstreet that assigns a unique numeric identifier, referred to as a “DUNS number” to a single business entity (Source:wikipedia). If you have created an Apple App Store Developer account, you should already have a D-U-N-S number as it is a requirement. Your finance or accounting department should have a record of that number. Alternatively, US organizations can look up their number using this online tool https://www.dnb.com/duns/duns-lookup.html. You can also call D&B Customer Service.
Once you enter your number, the system will ask you to select the matching business.
4. Entering Organization Information
For this step, you will be asked to enter a little bit of information about your organization such as the type, the size, the main phone number, and website address.
Note: Make sure to enter your country code (+1 for USA and Canada) and omitting dots, parenthesis, and dashes when entering your phone number. For example, for a number like (604) 304-0020, you would enter +16043040020.
5. Entering Contact Details
The contact details are how Google will contact you going forward. The information provided here will also be used when Google performs the final verification step (Step #7). You need to enter your email address and phone number. None of this information will be made public so you can enter your assigned email address and mobile number or your direct line. The email and number entered need to be verified on the spot before you can proceed to the next step. For both methods, you need to be able to receive a code. Unfortunately the form doesn’t accept phone extensions so you either need to use a mobile number so that you can receive a text or a call.
6. Filling Out Your Developer Profile
The developer profile information is the information shown on Google Play and will be part of your public profile. As such, you should only use public email addresses (such as support@, customer-service@, info@, and so on) and a public phone number. Again the email address and phone number will need to be verified. If you do not have a public phone number without an extension that can receive a call, we recommend talking to your IT staff and see if the auto-attendant can be disabled shortly during the verification process (takes about a minute) so that you can receive the call and the code.
7. Providing Necessary Documentation to Complete The Verification Process.
Once you have completed step 6, you will be done with the steps that can be completed via the Google Play Developer Console interface and you will need to wait for an email from Google Payments with the subject “You need to verify your identity”. Within that email, there will be a button “Verify now” to complete the verification process.
Once you click on Verify Now, you will see a dialog that will let you know the type of official documentation required to complete the verification process. The type of documents will vary depending on your organization type. Refer to the dialog for the options. You will also need to provide a picture (apparently PDF scans do not work) of your ID such as driver’s license, passport, national identity card, or residence permit.
You will be asked to enter your address that’s on your ID.
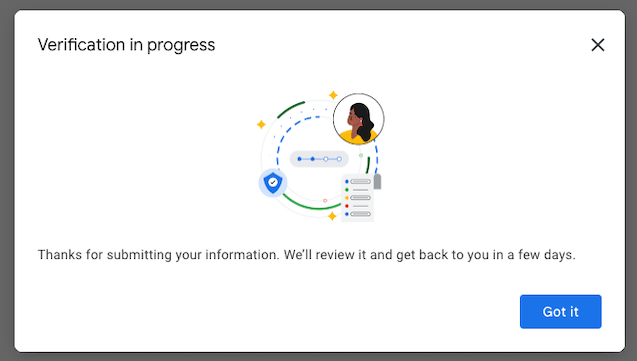
Upload the documents as required and your address and then click Submit. You should see a dialog similar to:
You should be all set. Within a few days (usually a day), you will be informed if your verification was successful or not.
If you have any questions regarding this process, feel free to contact us.
UPDATE 2024-10-09
A few notes we have learned since we posted the article:
- Pictures of your ID need to be in colour. Apparently black and white won’t do.
- For Government agencies, the choices of document are one of
- A letter or notice issued or stamped by the IRS, such as CP 575 that confirms your Employer Identification Number (EIN).
- A copy of the organization’s Form 8871, 8872, or 990 from the IRS website.
- A state-issued certificate of business registration or incorporation.
- Your organization’s most recent SEC filling, including Form 10-K, 10-Q, or 8-K.
- A business credit report from Experian, Equifax, or TransUnion.
- A dated letter requesting verification for a government or public agency, written on official agency letterhead.
For a few of the government agencies we have helped, item #6 worked and may be the easiest path.
UPDATE 2024-11-18
Google finally published a guide. You can view it here. It covers the steps above but with a lot more details. If the process above doesn’t work for you, we recommend reading their guide.
Share This Article